How to Make a Concrete Countertop
Are you searching for how to produce DIY concrete countertops? If so, you have landed in the right place! This comprehensive guide details the materials and tools needed, how to make concrete countertop mix successfully, and the step-by-step process of producing your very own impressive custom countertop.
Using Smooth-On materials, this tutorial will demonstrate creating a glass fiber reinforced concrete (GFRC) countertop. Built to last, this beautiful piece can either be used in your own workshop, or you can create it to meet the specifications of clients. Either way, it’s well worth the effort.
MATERIALS AND TOOLS NEEDED FOR A CONCRETE COUNTERTOP
- Melamine boards. The moulds for the countertop are made with melamine boards.
- Bandsaw. This power tool provides precision when cutting the melamine boards into the right dimensions.
- Nail gun. For joining together the melamine board joints.
- AquaCon concrete release agent. Helps with releasing the concrete casting from the mould.
- Kwikee sprayer. To apply the concrete release agent with speed and consistency.
- TASK 16. This is used to make a rubber edge that goes within the mould.
- Type 1 Portland cement. The cement is the biggest volume ingredient added to make the GFRC countertop.
- Silica sand. Further durability is added to the cement mixture with silica sand.
- Forton VF-774. This all acrylic, co-polymer dispersion is designed specifically for the production of GFRC.
- Water. Added to the concrete mixture.
- Plasticizer. This is used to provide added workability and viscosity to the concrete mixture.
- Heavy-duty mixing buckets. Robust containers are required to hold the ample volume of ingredients for mixing.
- Scale. For measuring accurate quantities of the ingredients.
- Industrial mixer. To mix together the ingredients thoroughly.
- Hopper gun. To spray a uniform layer of the face coat onto the mould surface.
- Chip brush. Used to break any existing air pockets within the face coat.
- AR glass fiber. This Glass Fiber is added to the backer coat for additional strength.
- Compaction roller. Used to limit air entrapment in the backer coat.
- Depth gauge. To measure and check the casting thickness is uniform throughout.
- AR glass scrim. The scrim is worked into the wet backer coat, giving the concrete further tensile strength.
- Scissors. To cut the glass scrim to the desired length.
- Trowel. The surface of the backer coat is smoothed out with the use of a trowel.
- Plastic sheet. A plastic sheet is laid over the mould for the curing process.
- Glue gun. To attach the risers to the countertop.
PREPARING YOUR WORK AREA
Your work area needs to be one that has ample space to store your tools and materials. Not only that, but it also has to be safe, dry, and at a controlled temperature – otherwise, it could have a detrimental impact on the final product.
The curing process for the concrete countertop is over one week in total. As a result, you require a workspace that is big enough to store the countertop without it getting in the way of other projects.
To save time, we recommended you organise all the items you require for making the countertop. By having everything in one place ready to go so you won’t have to go searching around to find certain tools or materials.
STEP-BY-STEP TUTORIAL: HOW TO MAKE CONCRETE COUNTERTOPS
If you’re wondering how to make your own concrete countertops wonder no longer. This comprehensive tutorial will guide you through each step, leaving you with a stunning GFRC concrete countertop at the end of the process.
Alternatively, you can watch the video tutorial on How To Make Custom Concrete Countertops using GFRC here.
STEP #1 – PREPARING THE MOULD
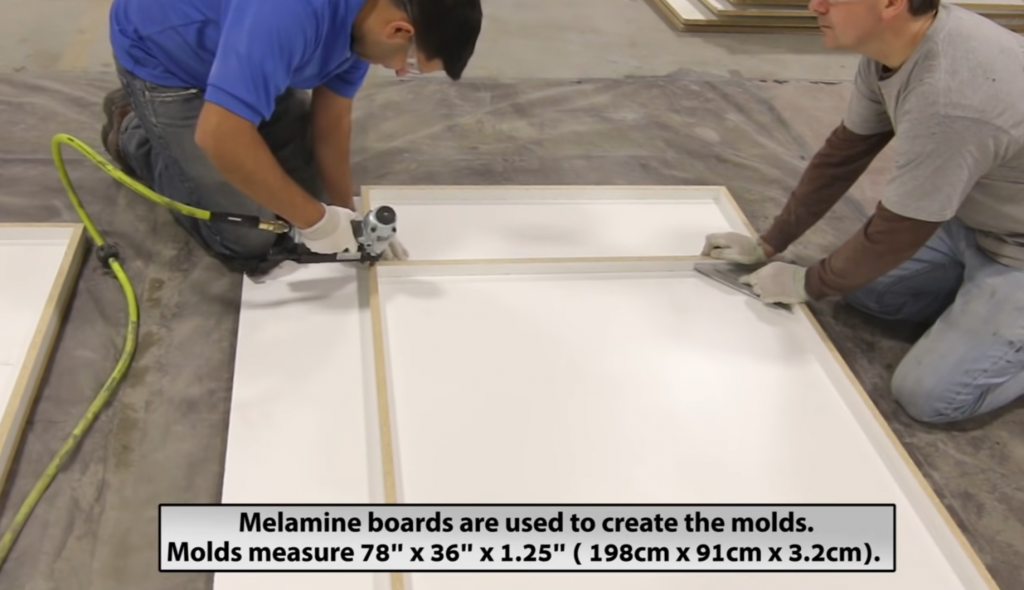
To prepare the mould for your GFRC concrete countertop, you will need melamine boards. These boards will serve not just as the surface of the mould but also as the walls. The measurement for the mould is as follows: 78” x 36” x 1.25” (198 cm x 91 cm x 3.2 cm).
First of all, precisely cut the melamine boards with a bandsaw or other suitable piece of equipment. Then use a nail gun to attach the boards together, creating a mould with the right dimensions.
To assist with releasing the concrete countertop once it’s complete, spray AquaCon concrete release agent into the melamine moulds. You can do this using a Kwikee Sprayer, which will save you over 60% vs. aerosols. Simply pour the AquaCon into the Kwikee Spray and spray the mould.
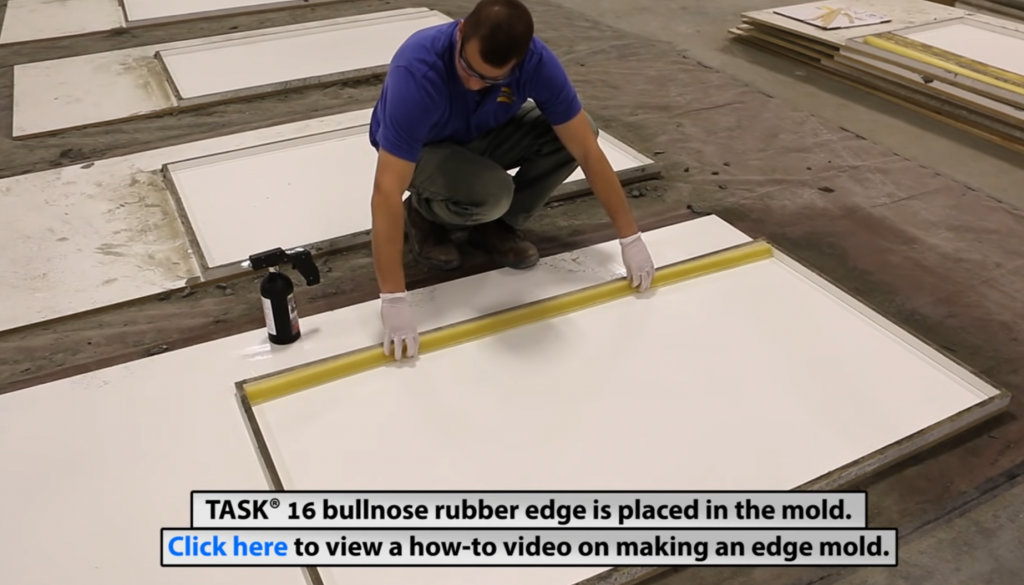
With the TASK 16, create a bullnose rubber edge and place this on one of the longest sides of the mould.
STEP #2 – PREPARING & APPLYING THE GFRC FACE COAT
For the GFRC face coat, you will need to mix together the following ingredients:
- Type 1 Portland cement (100 parts)
- Silica sand (85 parts)
- Water (24-27 parts)
- Forton VF-774 (10-12 parts)
- Plasticizer (4-8 oz/100 lbs cement generally)
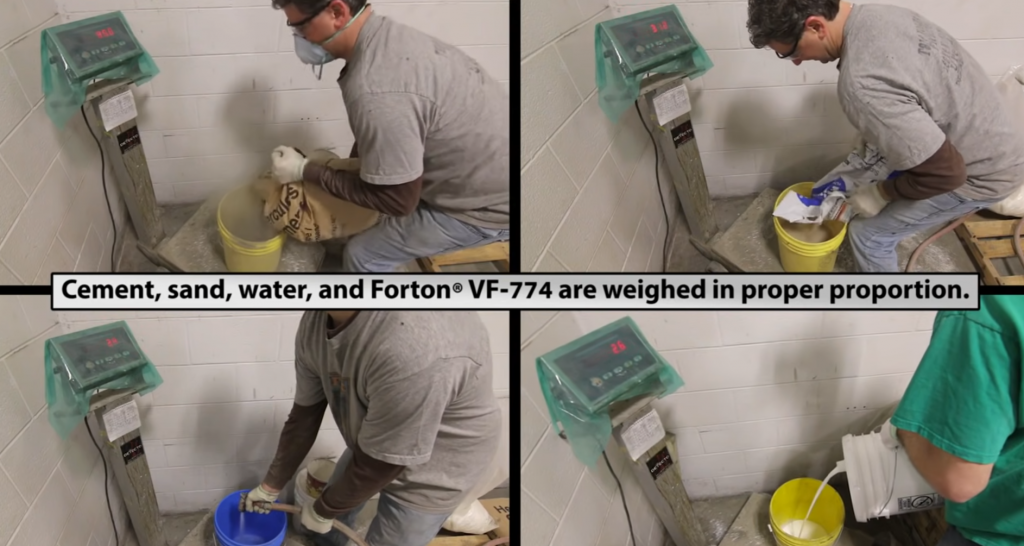
First, start by grabbing suitable containers, placing these on an appropriate scale, and measuring out the above ingredients with the correct proportions. Add all of the wet components into a heavy-duty container and thoroughly mix these together. While this is happening, carefully add in the plasticizer. Continue doing so until the necessary viscosity is achieved with the mixture. Now pour in the dry components and mix everything together thoroughly.
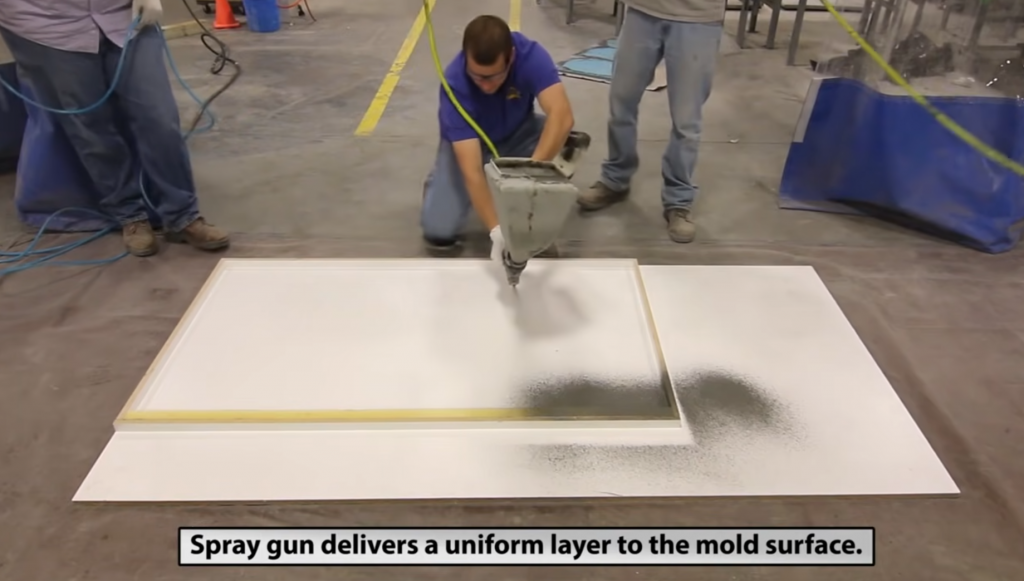
Transfer the GFRC face mix into a hopper gun. Take time and care with this spray gun to dispense an even layer to the mould’s surface. If there are any excess sand particles, remove these with an air nozzle. Use a chip brush to lightly go over the concrete surface to break any existing air pockets. This is how to make concrete countertops smooth.
Leave the face coat to partially cure for between 20 and 40 minutes. This is dependent on your workshop’s humidity and temperature.
STEP #3 – PREPARING & APPLYING THE BACKER MIX
For the backer mix, you require these ingredients and measurements:
- Type 1 Portland cement (100 parts)
- Silica sand (85 parts)
- Water (24-27 parts)
- Forton VF-774 (10-12 parts)
- Plasticizer (4-8 oz/100 lbs cement generally)
- AR glass fiber (3% of overall mix by weight)
As with the face coat, add all of the components together and mix them thoroughly – including the AR glass fiber. Again, include the necessary amount of plasticizer before you have attained the desired level of viscosity.
Apply the backer coat to the mould. This is much thicker than the face coat, with it reaching the top of the mould’s sides. Distribute the mixture evenly and up against the rubber bullnose – this can be done with your hands just ensure you’re wearing gloves. Now use a compaction roller, aka a “bubble buster” across the backer coat’s surface to minimise air entrapment.
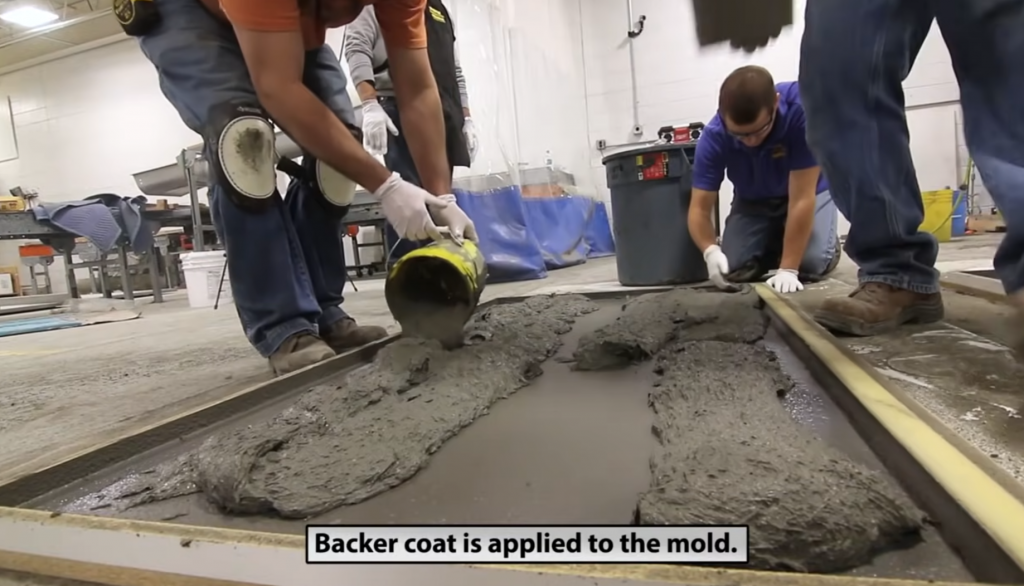
To ensure the casting thickness is uniform throughout, you can measure this with a depth gauge.
Now cut the AR glass scrim to fit the mould, then work this into the still-wet backer mix – you can do this by hand. Smooth out the surface with a trowel. Now produce a “false edge” by placing additional cement mixture around the perimeter of the mould.
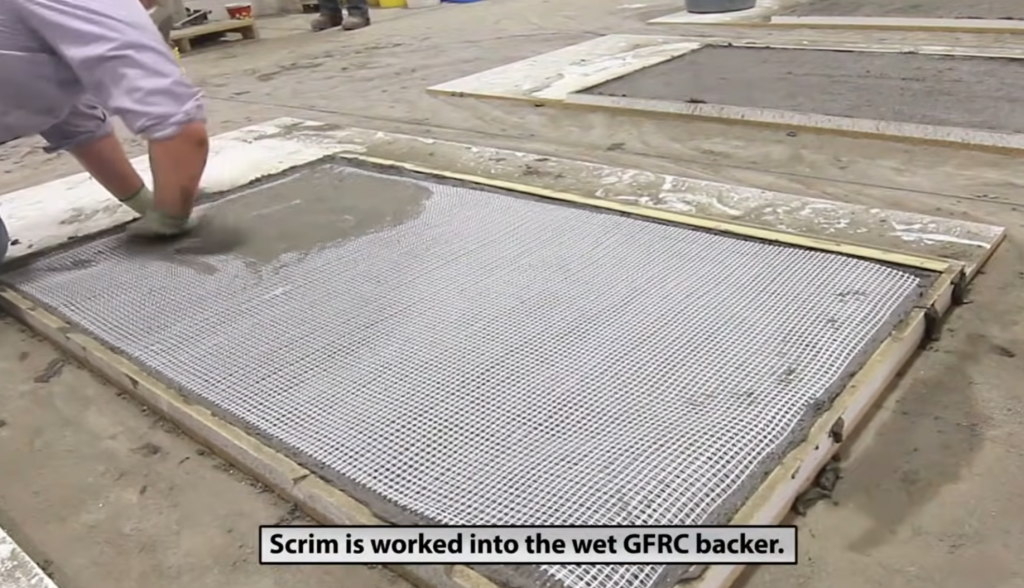
Place a plastic sheet over the mould. This maintains the heat of hydration while preventing excessive moisture loss. Leave to cure for 16 hours.
STEP #4 – DEMOULDING AND CURING
After leaving until the next day, the concrete casting is easy to remove from the mould. Next, remove the TASK 16 bullnose from the casting.
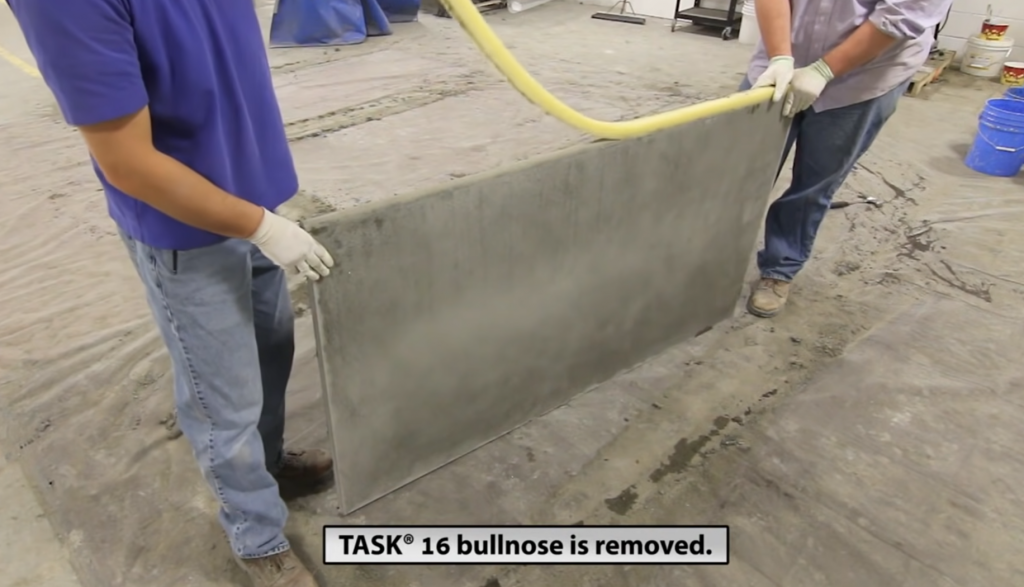
Before it is ready for installation, place the casting onto a flat surface and leave it to cure for a further seven days.
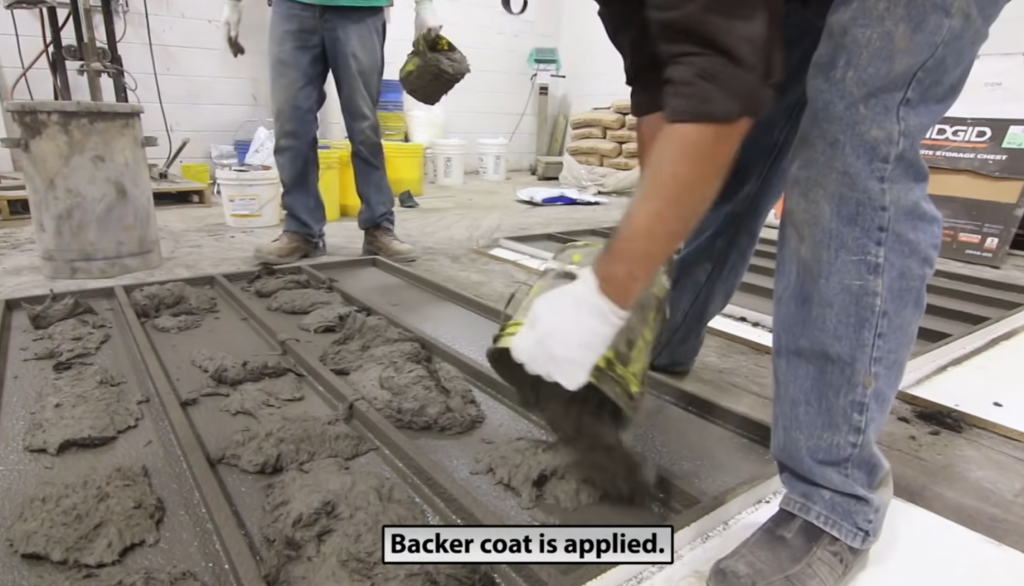
STEP #5 – CREATING RISERS AND SHELVES
Creating the risers and shelves involves much of the same steps as above. For the melamine mould, the dimensions are as follows: 78” x 10” x 3.25” (198 cm x 25 cm x 8.2 cm).
First, start by applying the AquaCon to the mould via the Kwikee Spray. Then apply the face coat, the backer coat, the AR glass scrim, smooth out, and then cover with plastic as you leave it to cure overnight.
Once cured, remove the panel from the mould.

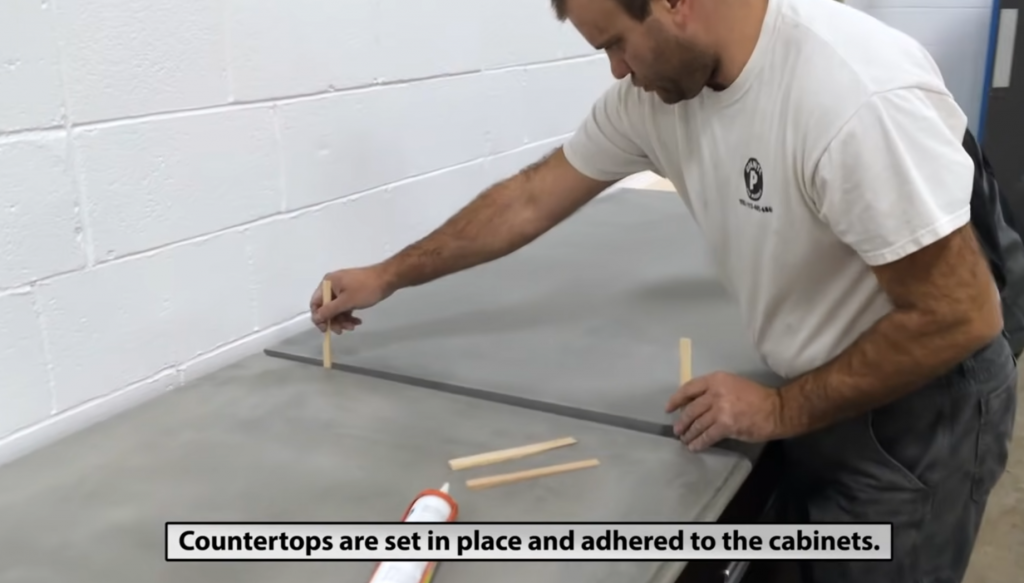
STEP #6 – INSTALLATION
Set the countertop in place and adhere it to your cabinet of choice. With a hot glue gun, go over the bottom of the riser and carefully stick it in place towards the back of the countertop. Now slide the shelf atop the riser. Gaps can be left in the riser to install electric and air lines.
If you’re curious about how to make concrete countertops look like wood or how to make concrete countertops shiny, either can be achieved with further treatments to the countertop. For instance, to make the countertop shiny, this can be done by sealing and polishing it once installed.
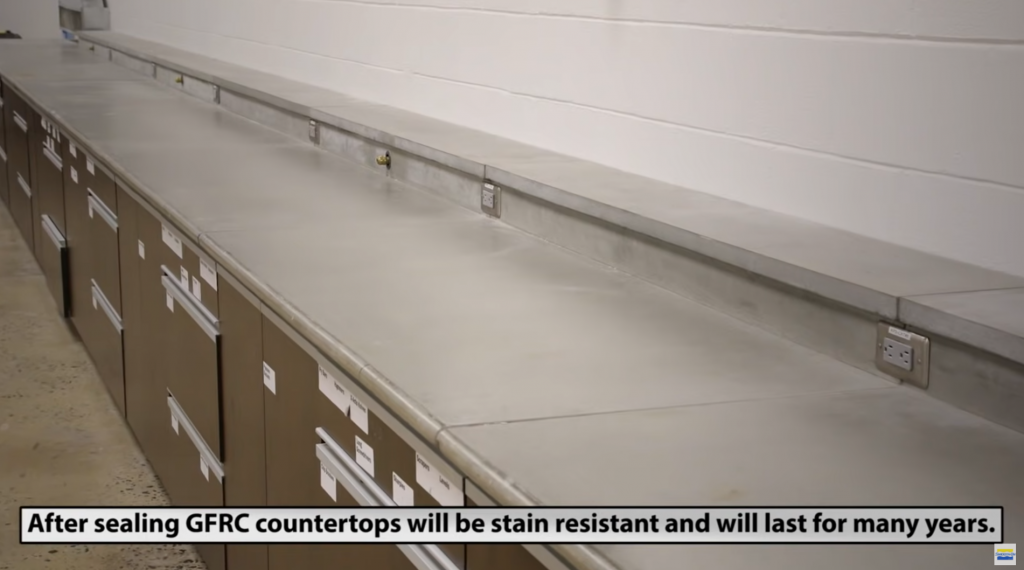
HOW DURABLE IS THE FINISHED GFRC CONCRETE COUNTERTOP?
To demonstrate why the above is the best concrete mix for countertops, you only have to look at its durability. The countertop, along with being stain resistant, will last for many years. Furthermore, its stability means it can hold over 2,000 lbs in weight before breaking. This is aided by the flexural strength of GFRC.
IN CLOSING
Producing a concrete countertop is not easy. It’s a process that requires skill, patience, and the right equipment. Yet if you use the correct materials – and follow this guide – you’ll end up with a GFRC countertop that’s impressive in more ways than one. Not only is it a visual treat, but it’s also a practical one where it’s built to last.
For more concrete moulding and casting materials check out our product range.